Creative Cake Pop Flower Ideas
Highlighted under: Classic Bakery Favorites
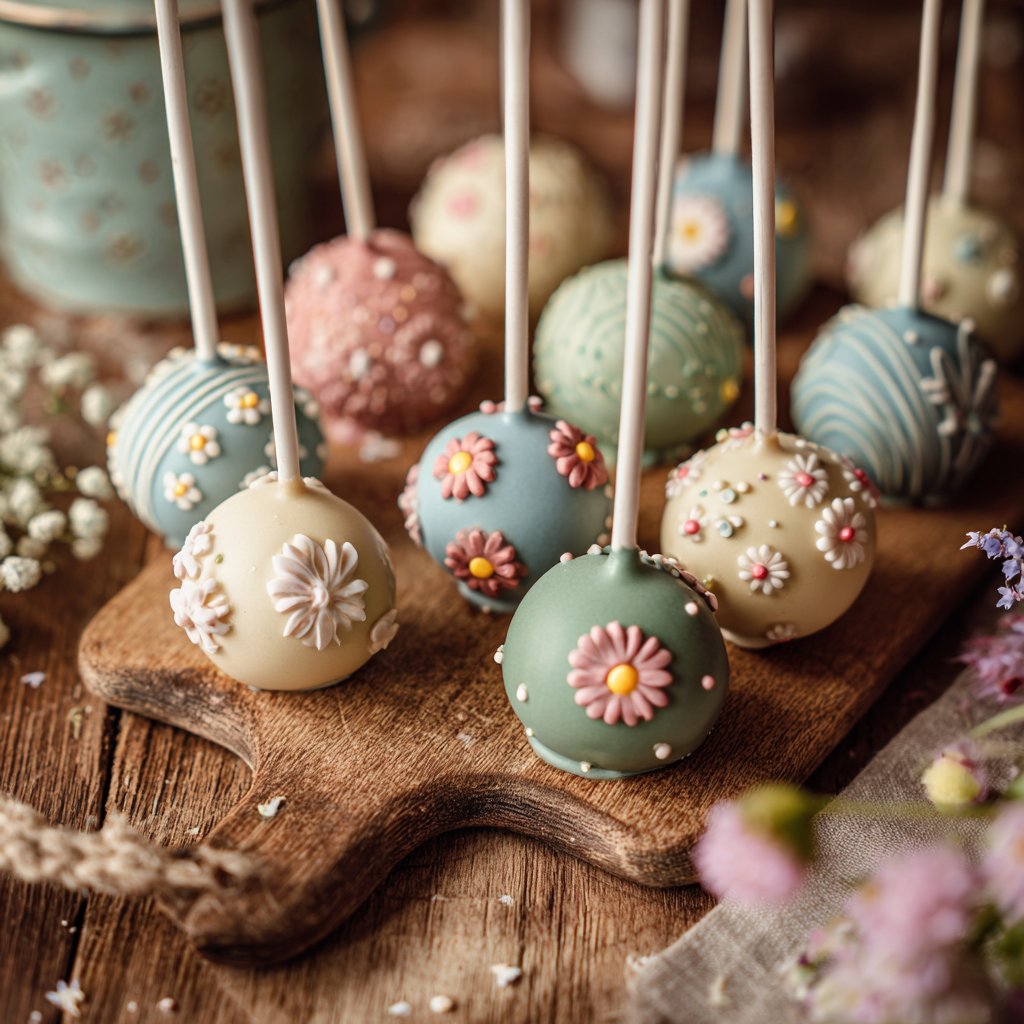
I love finding new and exciting ways to present treats, and cake pops have quickly become one of my favorite desserts to experiment with. This recipe allows me to transform simple cake pops into beautiful, flower-shaped creations that are perfect for any occasion. The visual appeal paired with the delicious flavors makes them a hit at parties and gatherings. Plus, I get to unleash my creativity by choosing different colors and decorations to customize each flower. It's a fun way to engage in baking and add a personal touch to my desserts!
When I first started making cake pops, I was amazed at how versatile they could be. One day, I decided to push the envelope by creating flower shapes instead of the traditional round ones. The results were stunning! It turned an ordinary dessert into a visually captivating treat that sparked joy and conversation at my table.
I found that using different colored melting chocolates and sprinkles really enhanced the floral theme. Additionally, I recommend using a sturdy cake pop stand to display them beautifully. This not only showcases my creations but also keeps them from toppling over. It’s the little things that make a big difference!

Why You'll Love This Recipe
- Transform ordinary cake pops into stunning flower shapes.
- Endless customization options with colors and decorations.
- Perfect for parties, gifts, or simply to brighten your day.
Techniques for Perfect Flower Cake Pops
When forming the flower shapes, it’s crucial to ensure that the mixture is not too sticky or too dry. If the mixture is overly crumbly, you can add a bit more frosting, while too much frosting can be countered with more crumbled cake. Aim for a manageable consistency that holds its shape when molded. Utilize flower-shaped cookie cutters for uniformity; this will help achieve a professional look, especially if you're creating these for a special occasion.
Chilling the formed cake pops in the refrigerator for about 15 minutes before dipping is essential. This step allows the cake pops to hold their shape better when submerged in melted chocolate. If they become too warm during the dipping process, they may lose their integrity and fall apart. It’s a good practice to monitor the temperature of your workspace, especially during warm weather.
Creative Decorating Ideas
The decoration phase is where your creativity can truly shine! When using chocolate melts, consider mixing in a bit of coconut oil to achieve a smoother, shinier finish. This adjustment can help your chocolate dip maintain a glossy appearance and enhances the vibrant colors of any candy melts layered on top. Don't shy away from experimenting with different patterns and placements of sprinkles or edible flowers. They can transform an ordinary cake pop into an exquisite centerpiece.
If you want to create a unique texture or finish on your cake pops, try incorporating edible glitter or even fondant shapes. These additional decorations can give your flowers added flair and an artistic touch. Remember to apply these decorations while the chocolate coating is still tacky to ensure they adhere properly. For added depth, layer different colors of melts or use a piping bag to create intricate designs.
Storing and Serving Tips
Once decorated, your cake pops can be stored in an airtight container in the refrigerator for up to one week. For longer storage, consider freezing them individually on a baking sheet before transferring them to a freezer-safe container. When ready to enjoy, let them thaw in the refrigerator to maintain texture and flavor. Avoid thawing at room temperature as this can result in condensation and a soggy exterior.
These cake pop flowers are not just treats; they can also be lovely gifts for friends or party favors. Pair them with a themed container or create a delightful bouquet of cake pops for special occasions. For an interactive gathering, set up a cake pop decorating station with various toppings and icings, allowing guests to personalize their creations, making your event even more memorable.
Ingredients
Ingredients
For the Cake Pops
- 1 box cake mix (any flavor)
- 2 cups frosting (matching flavor)
- Chocolate melting wafers (various colors)
- Lollipop sticks
- Candy melts for decoration
- Edible flowers or sprinkles (optional)
Gather all these ingredients and let’s get started!
Instructions
Instructions
Bake the Cake
Prepare the cake mix according to the instructions on the box. Once baked, let it cool completely before crumbling it into a large bowl.
Mix with Frosting
Add the frosting to the crumbled cake, mixing until well combined. It should be moldable but not too wet.
Form Flower Shapes
Take portions of the cake mixture and form them into flower shapes. Use cookie cutters if needed for more precision.
Insert Sticks
Dip the end of each lollipop stick into the melted chocolate and then insert it into the base of each flower shape.
Chill and Dip
Place the cake pops in the refrigerator for about 15 minutes to firm up. Once firm, dip each flower into the melted chocolate and allow excess to drip off.
Decorate
While the chocolate is still warm, decorate with edible flowers, sprinkles, or additional candy melts to create flower details.
Serve
Place the finished cake pops into a cake pop stand or a piece of floral foam to set. Enjoy your beautiful creations!
Make sure to let them set completely before serving!
Pro Tips
- Experiment with different flavors of cake and frosting combinations for an even more unique cake pop experience.
Ingredient Substitutions
If you're making these cake pops for someone with dietary restrictions, there are plenty of substitutions to explore. You can use gluten-free cake mixes to cater to gluten-sensitive friends without compromising flavor. For a dairy-free option, consider using non-dairy frosting and chocolate wafers, which are readily available in most grocery stores. These substitutions will yield cake pops that are just as delightful as the originals.
For a healthier alternative to traditional frosting, you can experiment with Greek yogurt mixed with a bit of honey or maple syrup. This not only reduces sugar content but also adds protein, making your treats slightly more nutritious while maintaining moisture and flavor. Just ensure the mixture is thick enough to bind with the crumbled cake.
Variations on the Theme
Consider experimenting with different flavor profiles by using cake mixes like lemon, red velvet, or even chocolate mint. Each flavor can inspire different color palettes and decorative themes for your cake pop flowers. For instance, a lemon-flavored cake pop can be complemented with bright yellow and green decorations, mimicking a cheerful sunflower.
Another fun variation is to infuse the frosting with extracts or flavored oils, such as almond or raspberry, to add another layer of taste. Mixing different frosting flavors can result in delightful surprises when taking a bite. For a truly unique twist, try incorporating bits of fruit or nuts into the cake mixture before forming the flowers to enhance texture and flavor.
Questions About Recipes
→ Can I use any type of cake mix?
Yes, feel free to experiment with different flavors to suit your preferences.
→ How can I store leftover cake pops?
Store them in an airtight container in the refrigerator for up to a week.
→ What kind of candy decorations work best?
Gummy candies, chocolate sprinkles, and edible glitter all make great decorative choices!
→ Can I make these ahead of time?
Absolutely! You can prepare and decorate them a day in advance.
Creative Cake Pop Flower Ideas
Created by: The Chef mario's recipes Team
Recipe Type: Classic Bakery Favorites
Skill Level: Intermediate
Final Quantity: 24 cake pops
What You'll Need
For the Cake Pops
- 1 box cake mix (any flavor)
- 2 cups frosting (matching flavor)
- Chocolate melting wafers (various colors)
- Lollipop sticks
- Candy melts for decoration
- Edible flowers or sprinkles (optional)
How-To Steps
Prepare the cake mix according to the instructions on the box. Once baked, let it cool completely before crumbling it into a large bowl.
Add the frosting to the crumbled cake, mixing until well combined. It should be moldable but not too wet.
Take portions of the cake mixture and form them into flower shapes. Use cookie cutters if needed for more precision.
Dip the end of each lollipop stick into the melted chocolate and then insert it into the base of each flower shape.
Place the cake pops in the refrigerator for about 15 minutes to firm up. Once firm, dip each flower into the melted chocolate and allow excess to drip off.
While the chocolate is still warm, decorate with edible flowers, sprinkles, or additional candy melts to create flower details.
Place the finished cake pops into a cake pop stand or a piece of floral foam to set. Enjoy your beautiful creations!
Extra Tips
- Experiment with different flavors of cake and frosting combinations for an even more unique cake pop experience.
Nutritional Breakdown (Per Serving)
- Calories: 150 kcal
- Total Fat: 7g
- Saturated Fat: 4g
- Cholesterol: 20mg
- Sodium: 50mg
- Total Carbohydrates: 21g
- Dietary Fiber: 1g
- Sugars: 15g
- Protein: 2g